CHT Core dev environment setup
Get your local machine ready to do development work on CHT Core
This guide assumes you are a CHT Core developer wanting to run the CHT Core from source code to make commits to the public GitHub repository. To set up your environment for developing apps, see the app guide.
To deploy the CHT in production, see either hosting section.
The Happy Path Installation
CHT Core development can be done on Linux, macOS, or Windows (using the Windows Subsystem for Linux (WSL2)). This CHT Core developer guide will have you install NodeJS, npm, and CouchDB (via Docker) on your local workstation.
Tip
Ensure you have at least 8GB RAM, 50GB Free disk and 4 cores. However, more is for sure better here - you’ll see real speed improvements with more RAM and more cores.
Install NodeJS, npm, and Docker
First, update your current packages and install some supporting tools:
(Node 22 is the environment used to run the CHT server in production, so this is the recommended version of Node to use for development.)
sudo apt update && sudo apt -y dist-upgrade
sudo apt -y install xsltproc curl uidmap jq python3 git make g++
# Use NVM to install NodeJS:
export nvm_version=`curl -s https://api.github.com/repos/nvm-sh/nvm/releases/latest | jq -r .name`
curl -o- https://raw.githubusercontent.com/nvm-sh/nvm/$nvm_version/install.sh | $SHELL
. ~/.$(basename $SHELL)rc
nvm install 22Now let’s ensure NodeJS 22 and npm 10 were installed. This should output version 22.x.x for NodeJS and 10.x.x for npm:
node -v && npm -vInstall Docker:
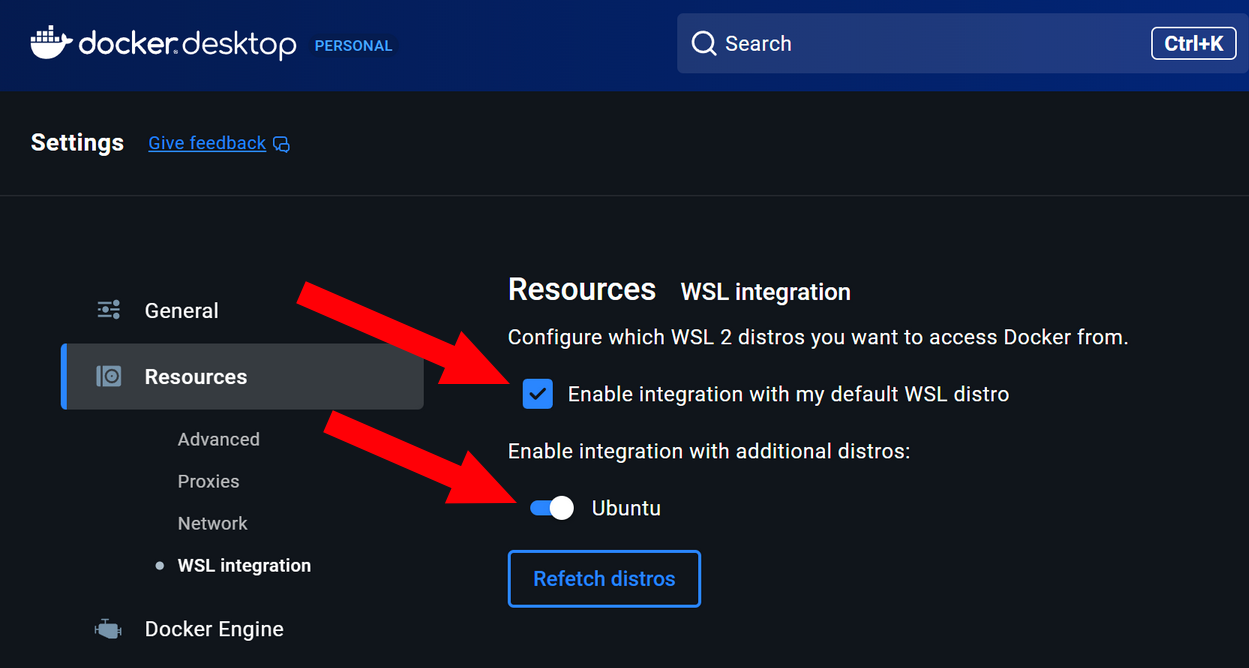
Download and install Docker Desktop.
Alternatively, on Linux you can use the following commands to install Docker Engine. (This will reduce the layers of technical abstraction for running containers, but will not include a GUI application for managing your Docker resources.)
curl -fsSL get.docker.com -o get-docker.sh && sh get-docker.sh
# OPTIONAL: Allow user to run Docker without sudo
dockerd-rootless-setuptool.sh install
echo "export PATH=/usr/bin:$PATH" >> ~/.$(basename $SHELL)rc
echo "export DOCKER_HOST=unix:///run/user/1000/docker.sock" >> ~/.$(basename $SHELL)rc
. ~/.$(basename $SHELL)rc
Restart your entire machine to finish initializing Docker.
After restarting, verify Docker is running as expected. Run the simple hello-world Docker container. This should output “Hello from Docker!” as well as some other intro text:
docker run hello-worldCHT Core Cloning and Setup
Clone the main CHT Core repo from GitHub and change directories into it:
git clone https://github.com/medic/cht-core ~/cht-core
cd ~/cht-core
Install dependencies and perform other setup tasks via an npm command. Note this command may take many minutes. Be patient!
npm ciTo finalise setting up any remaining dependencies build the project by running:
npm run build-devEvery time you run any npm or node commands, it will expect COUCH_NODE_NAME and COUCH_URL environment variables to be set:
echo "export COUCH_NODE_NAME=nonode@nohost">> ~/.$(basename $SHELL)rc
echo "export COUCH_URL=http://medic:password@localhost:5984/medic">> ~/.$(basename $SHELL)rc
. ~/.$(basename $SHELL)rc
To ensure these to exports and sourcing your rc file worked, echo the values back out. You should see nonode@nohost and http://medic:password@localhost:5984/medic:
echo $COUCH_NODE_NAME && echo $COUCH_URLCouchDB
Create a docker-compose.yml and couchdb-override.yml files under the ~/cht-docker folder with this code:
mkdir -p ~/cht-docker
curl -s -o ~/cht-docker/docker-compose.yml https://staging.dev.medicmobile.org/_couch/builds_4/medic:medic:master/docker-compose/cht-couchdb.yml
cat > ~/cht-docker/couchdb-override.yml << EOF
services:
    couchdb:
        ports:
          - "5984:5984"
          - "5986:5986"
EOF
Now you can start CouchDB. The login for your CHT instance will be medic and the password will be password:
cd ~/cht-docker
COUCHDB_USER=medic COUCHDB_PASSWORD=password docker compose -f docker-compose.yml -f couchdb-override.yml up -d
Developing
Now you have everything installed and can begin development! You’ll need three separate terminals when doing development.
In the first terminal we’ll compile and deploy the web application by running:
cd ~/cht-core && npm run build-dev-watchBe very patient until you see:
“Waiting…”
In the second terminal we’ll start the API nodejs service by running:
cd ~/cht-core && npm run dev-apiFinally, in a 3rd terminal we’ll start the Sentinel nodejs service by running:
cd ~/cht-core && npm run dev-sentinelThat’s it! Now when you edit code in your IDE, it will automatically reload. You can see the CHT running locally here: http://localhost:5988/
When you’re done with development you can ctrl + c in the three terminals and stop the CouchDB container with docker stop medic-couchdb. When you want to resume development later, run docker start medic-couchdb and re-run the three terminal commands.
Adding and accessing data
When you first start your CHT instance, it has no data in it. If you would like to populate it with some sample data, you can check out the Test Data Generator (TDG) which has a “Quick Start” option to easily add data. After you have installed TDG, you can quickly add data with this call:
COUCH_URL=http://medic:password@localhost:5984 tdg ./sample-designs/easy-mode.jsWhen you log into the CHT web front end in a browser at http://localhost:5988/, you should now see newly added contacts and reports.
If you would like to explore the raw data, be sure to check out Fauxton. This is a pre-installed NoSQL web client that allows you to browse all raw documents and indexes in CouchDB. It is accessed at /_utils, so if you’ve just followed this guide you can go to http://localhost:5984/_utils to use Fauxton. If you are prompted to log in, it is Username medic and Password password.
Other Path Troubleshooting
If you weren’t able to follow the happy path above, here are some details about the developer install that may help you troubleshoot what went wrong.
Prerequisites
If you had issues with following the above steps, check out these links for how to install the prerequisites on your specific platform:
- Node.js 22.x & npm 10.x.x - Both of which we recommend installing via
nvm - xsltproc
- python 2.7
- Docker
- CouchDB - OS package instead of in Docker - you MUST use CouchDB 2.x for CHT < 4.4! We still strongly recommend using Docker.
- [bzip2])(https://sourceware.org/bzip2/downloads.html) - if you’re on Ubuntu call:
sudo apt install bzip2
Windows WSL2
While this document covers the happy path to set up your environment, there’s a great forum post which covers challenges developers running Windows with WSL2 may face. Be sure to read up on it if you’re having WSL2 issue like bash: docker: command not found and others.
Ubuntu 18.04
Ubuntu 18.04’s default apt repositories do not know about python2. This means when you go to install run the first apt install command above, you see an error:
E: Unable to locate package python2To fix this, change the apt install call to this:
sudo apt -y install xsltproc curl uidmap jq python git make g++As well, after you install docker, and go to run the rootless script dockerd-rootless-setuptool.sh, you might see this error:
[ERROR] Failed to start docker.service. Run `journalctl -n 20 --no-pager --user --unit docker.service` to show the error log.The workaround, unfortunately, is to just start your CouchDB Docker container with sudo: sudo docker run....
Required environment variables
Medic needs the following environment variables to be declared:
COUCH_URL: the full authenticated url to themedicDB. Locally this would behttp://medic:password@localhost:5984/medicCOUCH_NODE_NAME: the name of your CouchDB’s node. The Docker image default isnonode@nohost. Other installations may usecouchdb@127.0.0.1. You can find out by querying CouchDB’s membership API- (optional)
COUCHDB_USER: the name of your CouchDB’s user. The Docker image default ismedic - (optional)
COUCHDB_PASSWORD: the credentials of your CouchDB user. The Docker image default ispassword - (optional)
API_PORT: the port API will run on. If not defined, the port defaults to5988 - (optional)
CHROME_BIN: only required if tests complain that they can’t find Chrome or if you want to run a specific version of the Chrome webdriver.
How to permanently define environment variables depends on your OS and shell (e.g. for bash you can put them ~/.bashrc). You can temporarily define them with export:
export COUCH_NODE_NAME=nonode@nohost
export COUCH_URL=http://medic:password@localhost:5984/medic
Tests
Refer to the testing doc in the GitHub repo.
nginx-local-ip
nginx-local-ip is a local proxy that keeps all traffic local, and runs without latency or throttling. If sharing your local CHT instance is not required, it is the recommended method to add a valid SSL certificate (rather than ngrok or similar).
- Clone the repo:
git clone https://github.com/medic/nginx-local-ip.git cdinto the new directory:cd nginx-local-ip- Assuming your IP is
192.168.0.3, startnginx-local-ipto connect to:- The CHT API running via
npm runorhorti, executeAPP_URL=http://192.168.0.3:5988 docker compose upand then access it athttps://192-168-0-3.local-ip.medicmobile.org/. - The CHT API running via
docker, the ports are remapped, so executeHTTP=8080 HTTPS=8443 APP_URL=https://192.168.0.3 docker compose upand then access it athttps://192-168-0-3.local-ip.medicmobile.org:8443/.
- The CHT API running via
- The HTTP/HTTPS ports (
80/443) need to accept traffic from the IP address of your host machine and your local webapp port (e.g.5988) needs to accept traffic from the IP address of thenginx-local-ipcontainer (on the Docker network). If you are using the UFW firewall (in a Linux environment) you can allow traffic on these ports with the following commands:
(Since local IP addresses can change over time, ranges are used in these rules so that the firewall configuration does not have to be updated each time a new address is assigned.)
sudo ufw allow proto tcp from 192.168.0.0/16 to any port 80,443
sudo ufw allow proto tcp from  172.16.0.0/16 to any port 5988
Remote Proxies
ngrok and pagekite are remote proxies that route local traffic between your client and the CHT via a remote SSL terminator. While easy and handy, they introduce latency and are sometimes throttled. Always use nginx-local-ip when you need a TLS certificate and only use these when you need to share your dev instance.
ngrok
- Create an ngrok account, download and install the binary, then link your computer to your ngrok account.
- Start
ngrokto connect to:- The CHT API running via
npm runorhorti, execute./ngrok http 5988 - The CHT API running via
docker, execute./ngrok http 443
- The CHT API running via
- Access the app using the https address shown (e.g.
https://YOUR-NGROK-NAME.ngrok.io, replacingYOUR-NGROK-NAMEwith what you signed up with).
Note: The service worker cache preload sometimes fails due to connection throttling (thereby causing an ngrok failure at startup).
pagekite
- Create a pagekite account, download and install the python script.
- Start pagekite (be sure to replace
YOUR-PAGEKIT-NAMEwith the URL you signed up for) to connect to:
- The CHT API running via
npm runorhorti, executepython pagekite.py 5988 YOUR-PAGEKIT-NAME.pagekite.me - The CHT API running via
docker, executepython pagekite.py 443 YOUR-PAGEKIT-NAME.pagekite.me
- Access the app using the https address shown (e.g.
https://YOUR-PAGEKIT-NAME.pagekite.me).
Did this documentation help you ?