Build > Training > Training Cards
Remotely train health workers
Deploying in-app training cards for remote training
Training Cards enable remote training from within the CHT by showing a sequence of “cards” containing content provided by App Developers. The content might include information about a newly deployed feature, changes to a care guide, or simply a reminder about an underused feature or workflow. Enketo forms are used to display the content, and App Developers can specify a start date, duration, and to which user roles the cards should be shown. Like app forms, forms used by training cards will automatically be downloaded to the user’s devices.
Note
Example training forms are available here and provide a good starting point.
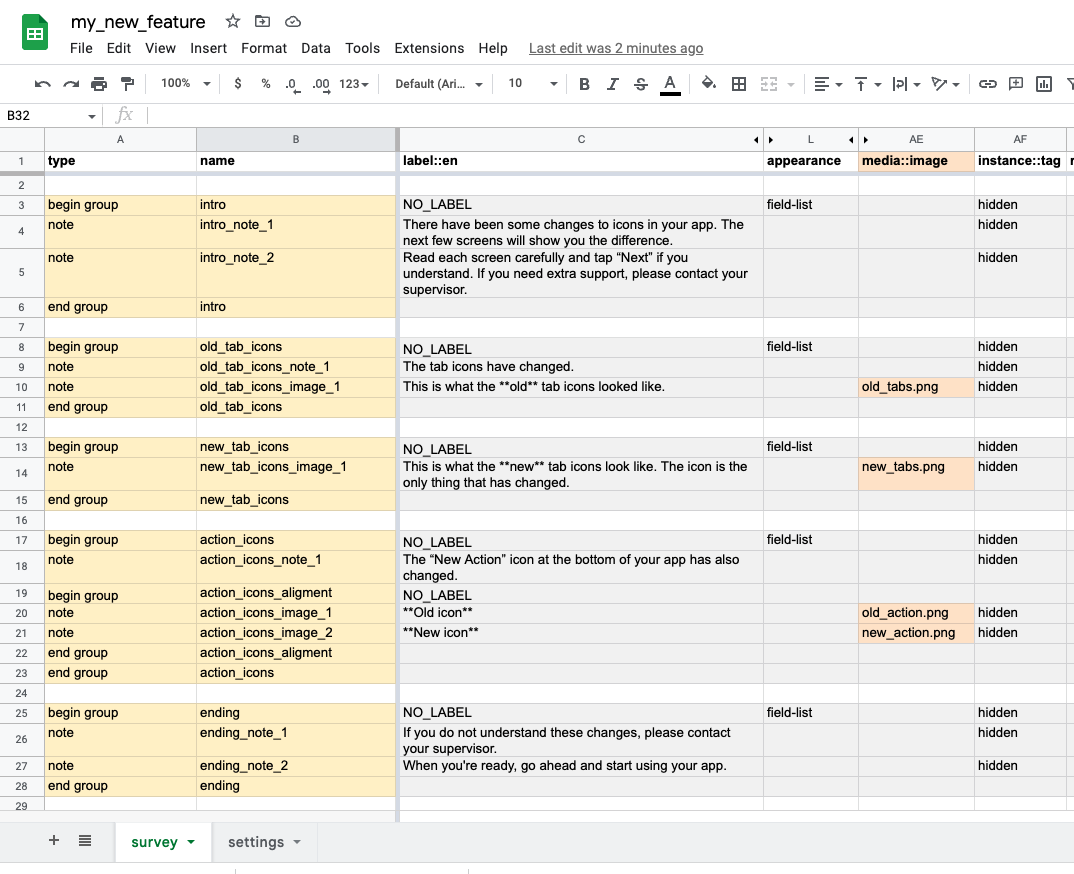
Create an XLS Form. In the following example, the training form is called my_new_feature, it has some text in the label::en column, and some images in the column media::images to illustrate the feature.

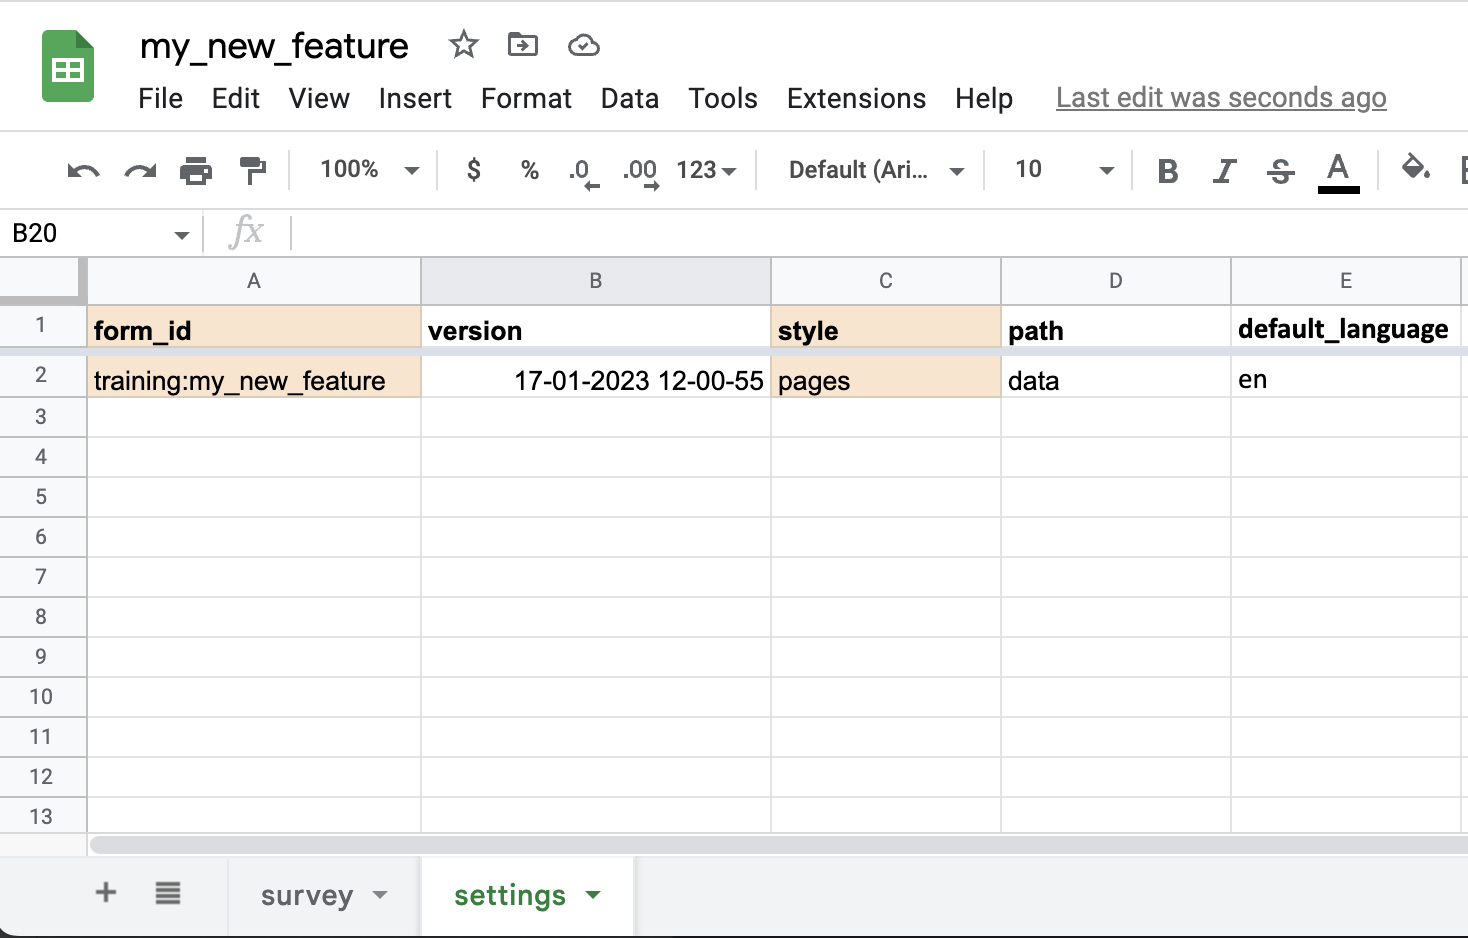
Important, define the form_id located in the settings sheet with the prefix training: and add the form name, otherwise the training card won’t display. In our example, the form_id should be training:my_new_feature.

Create a properties file to define the starting date of the training, the number of days it will be active, and the user roles that can access the training. In our example, the file name is my_new_feature.properties.json and contains the following properties:
{
  "title": "New workflow",
  "context": {
    "start_date": "2023-07-13",
    "duration": 60,
    "user_roles": [ "nurse" ]
  }
}
In the example above, the training cards could be shown to any user with the “nurse” role between July 13, 2023 and September 11, 2023 (inclusive). See more information about these configuration settings below:
| Property | Description |
|---|---|
| “title” | Enketo’s form title that is displayed in the modal’s header section. |
| “start_date” | Optional. Define the training start day using yyyy-mm-dd format. If not defined then the training will start immediately. |
| “duration” | Optional. Number of days this training should be active. If not defined then the training will never expire. |
| “user_roles” | Optional. List of user roles that can access this training. If not defined then all users can access the training. |
Note
Users with an admin role can access training cards but they need to have a contact associated in the org.couchdb.user:[user-name] document from CouchDB.
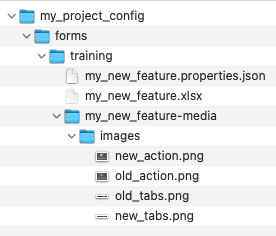
If your training form has images, create a folder with the same name as the form and add -media suffix. In our example, the form name is my_new_feature, then the folder name should be my_new_feature-media.
Inside that new folder, make another one called images and put inside all the images that your form needs. See more about multimedia in forms.
In your project configuration folder, place the XLS form, the properties file, and the media folder inside /forms/training/. The file structure should look like this:

Open the terminal and use the latest version of the cht command line tool to convert and upload the training form:
Convert the form by running this command:
cht --url=[instance_url] convert-training-forms -- [form_name]Example:
cht --url=http://admin-user:secretpass@my-xyz-project.org convert-training-forms -- my_new_featureUpload the form by running this command:
cht --url=[instance_url] upload-training-forms -- [form_name]Example:
cht --url=http://admin-user:secretpass@my-xyz-project.org upload-training-forms -- my_new_featureAt this point the training cards are ready to use. You can verify by logging in with a user that has a valid role assigned for the training card, on the day that the training starts. Remember, to sync the app to see the results (the uncompleted training will display once a day).
Using telemetry you can monitor user interaction with each training card “set”. Some key metrics you can view include:
* Training Cards are designed to only be viewed once so this should normally only ever be 0 or 1. It is possible that a user deletes the training “report”, in which case they would be presented with training cards again.
Example SQL:
SELECT
	doc#>>'{metadata,user}' AS cht_user,
	doc#>>'{metadata,deviceId}' AS device_id,
	concat(doc#>>'{metadata,year}', '-', doc#>>'{metadata,month}', '-',doc#>>'{metadata,day}')::date AS telemetry_date,
	COALESCE(doc#>>'{metrics,enketo:training:<my_new_feature>:add:render,count}','0')::int AS count_render_training,
	COALESCE(doc#>>'{metrics,enketo:training:<my_new_feature>:add:user_edit_time,count}','0')::int AS count_submit_training,
	COALESCE(doc#>>'{metrics,enketo:training:<my_new_feature>:add:user_edit_time,max}','0')::int/1000 AS max_seconds_on_form,
	COALESCE(doc#>>'{metrics,enketo:training:<my_new_feature>:add:user_edit_time,min}','0')::int/1000 AS min_seconds_on_form

FROM
    couchdb_users_meta

WHERE
	doc->>'type'='telemetry'
	AND doc#>'{metadata}' ? 'day'
	AND doc#>'{metrics}' ? 'enketo:training:<my_new_feature>:add:render'

ORDER BY
telemetry_date DESCRemotely train health workers
Training cards for CHT
App and care workflow training using remote capabilities
An integration built to pilot the integrated workflows focused on CHW remote learning and care support for COVID-19